DIY Robot Pet Hacks: 10 Creative Ways to Craft Your Own Accessories
Robot pets are already fun on their own, but the experience becomes much more personal when you start customizing them. Whether you have a robot dog, robot cat, AI companion pet, or a smaller programmable toy, DIY robot pet accessories can make daily interaction feel more playful, expressive, and practical. You don’t need advanced robotics knowledge to get started, either. Most useful upgrades involve soft materials, removable designs, clever storage, and simple craft ideas that make your robot pet easier to display, charge, photograph, or play with.
The key is knowing where creativity ends, and safety begins. A robot pet isn’t like a stuffed animal or regular toy. Many models rely on cameras, microphones, speakers, touch sensors, wheels, joints, and charging contacts. If an accessory blocks the wrong area or adds too much weight, your robot pet may move poorly, misread commands, overheat, or fail to charge properly. That’s why the best DIY robot pet hacks are lightweight, removable, and designed around the robot’s actual movement.
This guide focuses on creative accessories you can realistically make at home. You’ll find ideas for bandanas, charging stations, obstacle courses, display corners, name tags, costumes, organizers, and beginner-friendly enrichment toys. The goal isn’t to turn your robot pet into a complicated engineering project. It’s to make it feel more like part of your home while keeping it safe, functional, and fun to use.
Why DIY Robot Pet Accessories Are Worth Making
DIY robot pet accessories give you a way to personalize your device without depending only on official add-ons or expensive third-party products. Many robot pets are designed to feel companion-like, with movement, reactions, sounds, sensors, and programmable features that make them more engaging than ordinary electronic toys. Sony describes Aibo, for instance, as a robot companion with lifelike expressions and a wide range of movements, which explains why owners often treat robot pets as more than gadgets.
Accessories help strengthen that emotional connection. A simple scarf, mini collar, display mat, or name tag can make a robot dog feel less like a device sitting on the floor and more like a character in your home. For kids, crafting accessories can also turn robot pet ownership into a hands-on STEM-adjacent activity. They’re learning about design, weight, balance, movement, and sensors without needing to write code.
There’s also a practical side. A DIY charging station keeps cables tidy. A storage basket prevents small parts from getting lost. A soft play mat creates a consistent area where your robot pet can move without bumping into furniture. A homemade obstacle course encourages more interactive play. These upgrades don’t have to be complicated to be useful. The best ones solve small daily problems while adding personality.
Before You Start: How to Customize a Robot Pet Safely
Before making any robot pet accessory, inspect your device carefully. Look for cameras, microphones, speakers, charging contacts, moving joints, wheels, feet, vents, touch sensors, and buttons. These areas should stay open and unobstructed. Many robot pets depend on sensors to move, respond, recognize objects, or interact with people. National Geographic Education explains that robots typically rely on sensors, actuators, and programs to function, which is exactly why accessories need to be designed around those systems rather than placed over them.
A safe DIY accessory should be removable. Avoid permanent glue, strong adhesives, spray paint, nail polish, hot glue directly on the robot, and anything that leaves residue. Even if a sticker or charm looks harmless, adhesive buildup can affect buttons, seams, or charging points. Magnets should also be avoided unless the manufacturer specifically says they’re safe, since some electronics and sensors may react poorly to magnetic accessories.
Weight matters too. A heavy costume can strain motors, joints, or wheels. A loose cape can get caught in moving parts. A thick hat can block cameras or microphones. When in doubt, use soft fabric, lightweight felt, elastic loops, or Velcro straps that sit away from active components. The accessory should move with the robot rather than fight against it.
Best Materials for DIY Robot Pet Accessories
The best materials for robot pet accessories are soft, light, washable, and easy to remove.
- Felt is one of the easiest options because it keeps its shape, doesn’t fray much, and can be cut into small decorative pieces.
- Fleece is useful for cozy mats, mini blankets, and soft display areas because it adds texture without scratching the robot.
- Cotton fabric works well for bandanas, scarves, and seasonal accessories.
- EVA foam is another useful material because it’s lightweight and easy to shape. You can use it for small signs, decorative backdrops, pretend props, or obstacle course pieces.
- Cardboard is ideal for charging stations and play structures, especially if you’re testing a design before making a sturdier version.
- If you have access to a 3D printer, you can create custom stands, ramps, or accessory holders, but the edges should be smooth, and the fit should never clamp tightly onto the robot.
For fastening, choose removable options. Velcro strips, soft elastic, ribbon ties, and snap buttons are safer than permanent adhesives. If an accessory needs structure, build the structure into the accessory itself rather than attaching it directly to the robot. For example, a mini collar can close with Velcro at the back, while a display sign can stand on its own beside the robot instead of sticking to its body.
DIY Robot Pet Hack #1: Make a Soft Bandana or Mini Scarf
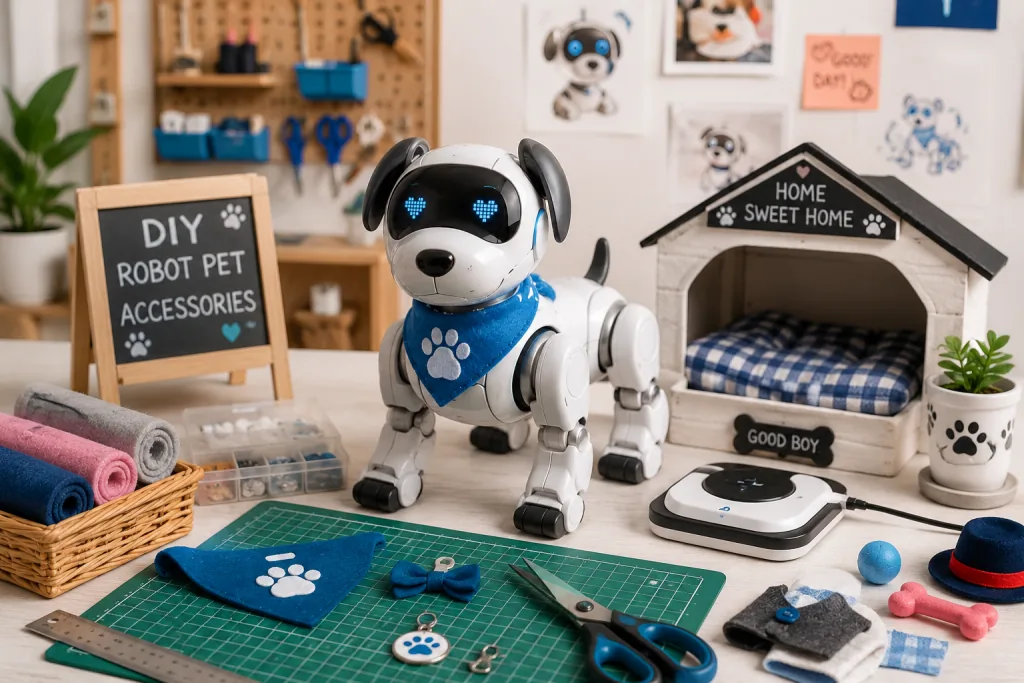
A bandana is one of the easiest DIY robot pet accessories because it adds personality without interfering with movement. It works especially well for robot dogs, robot cats, and small companion robots with a visible neck area or upper body shape. The safest design is a loose triangle of lightweight cotton or felt that closes with Velcro, elastic, or a soft tie. It should sit comfortably without pressing against buttons, sensors, speakers, or cameras.
Start by measuring the area where the bandana will sit. Don’t copy the size of a real pet collar unless the robot has a similar body shape. Robot pets often have unusual proportions, and a bandana that looks cute on a dog may be too bulky for a small AI pet. Cut a paper template first, place it gently around the robot, and check whether it blocks movement when the head turns or the body tilts.
This is also where personalization becomes fun. You can make different bandanas for holidays, birthdays, gaming setups, study desks, or bedroom themes. A red plaid bandana gives a robot dog a cozy cabin look, while a pastel scarf makes a small robot companion feel softer and friendlier. For kids, this is a safe starter project because it involves measuring, cutting, and decorating without touching the robot’s electronics.
DIY Robot Pet Hack #2: Build a Cozy Robot Pet Charging Station
A charging station is one of the most practical robot pet hacks because it gives your device a dedicated home. Instead of leaving the charger and cable loose on the floor, you can create a small “pet bed” or docking corner that keeps everything neat. This works especially well if your robot pet has a charging base, magnetic dock, or cable that always seems to get in the way.
The safest version starts with a shallow tray, small wooden crate, cardboard box, or acrylic organizer. The base should be wide enough for the robot to enter and exit comfortably. If the robot needs to roll, walk, or align itself with a charger, avoid raised edges that could block movement. For robots that must be manually placed on a dock, you can add a soft mat, cable clips, and a decorative backdrop.
Think of the charging station as both storage and display. You can add a name sign, small LED-free decorations, a printed background, or a tiny “robot pet house” label. Avoid glitter, loose beads, or fuzzy materials near charging contacts because small debris can cause problems. A good charging station should make the robot easier to use, not harder to dock.
DIY Robot Pet Hack #3: Create an Obstacle Course for Robot Dogs
An obstacle course turns your robot dog or wheeled robot pet into something more interactive. This idea works best for models that can walk, roll, follow commands, detect objects, or respond to movement. You don’t need a large setup. A few lightweight ramps, tunnels, markers, and safe barriers can create a fun play area that encourages more active use.
Use cardboard, foam board, pool noodles, paper cups, or soft blocks. Keep everything low and stable. The goal is not to challenge the robot with difficult terrain, but to create a controlled environment where it can move safely. If your robot has small wheels, avoid thick rugs or uneven surfaces. If it has legs, check whether the floor provides enough grip. Smooth tile can sometimes cause slipping, while deep carpet can strain movement.
A good obstacle course also helps you learn your robot pet’s limits. You’ll see how it responds to narrow paths, turns, low barriers, and open space. That makes it easier to design future accessories because you’ll understand how much clearance the robot needs. For families, this can become a recurring activity where kids redesign the course and test what works.
DIY Robot Pet Hack #4: Make Themed Costumes Without Blocking Sensors
Costumes are fun, but they’re also where robot pet customization can go wrong. A robot pet costume should never cover the camera, microphone, speaker, touch sensors, moving joints, wheels, feet, or ventilation areas. The safest approach is to make partial costumes rather than full-body outfits. A small cape, removable hat, lightweight collar, or themed back panel usually works better than a fitted outfit.
For a robot dog, you might create a superhero cape that attaches loosely around the body with Velcro, leaving the legs and sensors clear. For a robot cat, a tiny bow tie or soft collar may be enough. For a desk companion robot, a themed display base or background can create the costume effect without touching the robot at all.
Seasonal costume ideas work especially well. A Halloween bat collar, winter scarf, birthday crown, or tiny graduation sash can make the robot pet feel part of family moments. Just keep the fit loose, the weight minimal, and the design easy to remove. If the robot moves differently after you add the costume, take it off and simplify the design.
DIY Robot Pet Hack #5: Craft a Toy Basket and Accessory Organizer
Robot pet accessories can pile up quickly once you start making them. A small organizer keeps scarves, tags, props, charging cables, cleaning cloths, instruction manuals, and spare parts in one place. This may sound simple, but it improves the whole experience because you’re more likely to use accessories when they’re easy to find.
A small basket, drawer divider, craft box, or desktop organizer works well. Divide it into sections based on use: wearable accessories, play props, charging items, cleaning supplies, and seasonal pieces. If kids use the robot pet, label the sections clearly so they know where things belong. This also prevents unsafe items, like glue, scissors, or loose craft pieces, from ending up beside the robot.
You can decorate the organizer to match your robot pet’s personality. A futuristic silver box suits a tech-themed robot dog, while a soft pastel basket works for a cute companion pet. The organizer doesn’t interact with the robot directly, so you have more creative freedom than you do with wearable accessories.
DIY Robot Pet Hack #6: Build a Photo Booth or Display Corner
A robot pet photo booth is a smart DIY project because it creates a visual impact without attaching anything to the robot. This is perfect for owners who want cute photos, social media content, or a dedicated display area. It also works well for delicate robot pets where wearable accessories feel risky.
Start with a small backdrop made from foam board, cardboard, fabric, or printed paper. Add a base mat that gives the robot a stable footing. If your robot moves during photos, leave enough room so it doesn’t bump into the backdrop. You can create different themes, such as a mini living room, gaming setup, city street, classroom, birthday party, or space station.
Lighting matters, but avoid placing hot lamps too close to the robot. Soft room lighting or indirect daylight is safer. If your robot has cameras or sensors, very bright reflective surfaces may confuse it, so matte materials usually work better than shiny metallic paper. A display corner also doubles as storage because it gives the robot a consistent place to “live” when not in use.
DIY Robot Pet Hack #7: Make DIY Robot Pet Toys for Interaction
DIY robot pet toys should be designed around how your robot interacts with the world. Some robot pets respond to touch, some follow objects, some detect movement, and others react to sound or voice. The safest toys are lightweight, oversized enough not to get stuck, and free from loose pieces.
- For a robot dog that follows movement, you can create a soft fabric flag attached to a short stick and use it as a visual cue during play.
- For a robot pet with object recognition, simple high-contrast cards may help create games.
- For a rolling robot, you can build a cardboard maze with wide paths.
- For a stationary companion robot, you can make themed cards, emotion prompts, or storytelling props for kids to use during interaction.
Avoid anything that sheds, breaks apart, or can jam wheels and joints. Small pom-poms, loose feathers, glitter, and tiny beads are risky near moving parts. A good rule is to design toys as environmental props rather than chew toys. Robot pets don’t need plush squeakers or tug ropes the way real pets do. They need interaction cues, safe movement space, and owner-led play.
DIY Robot Pet Hack #8: Create Seasonal Accessories
Seasonal accessories are one of the easiest ways to keep your robot pet feeling fresh throughout the year. You can make a small set for Halloween, Thanksgiving, Christmas, Valentine’s Day, Easter, birthdays, summer, or back-to-school season. These projects are especially good for families because they’re creative but don’t require advanced tools.
A seasonal accessory kit might include a removable scarf, mini sign, display mat, photo booth background, and themed name tag.
- For Christmas, you might use soft red fabric, a tiny felt stocking prop, and a cardboard fireplace backdrop.
- For Halloween, you could make a black felt cape and a cardboard haunted house display.
- For summer, a beach towel-style mat and sunglasses-shaped paper prop can create the look without placing fragile items on the robot.
The best part is that seasonal accessories encourage ongoing engagement. Instead of playing with the robot pet for a week and forgetting about it, owners get a reason to refresh the setup. This is useful for kids, collectors, and anyone who likes creating content around their tech.
DIY Robot Pet Hack #9: Add Name Tags, Charms, and Personality Details
A name tag is a small accessory, but it can completely change how a robot pet feels. Giving the robot a name and visual identity makes it easier to treat it like a companion rather than a gadget. You can make a tag from felt, shrink plastic, cardstock, acrylic blanks, or lightweight foam.
The safest placement depends on the robot’s shape. If it has a collar area, the tag can hang from a soft loop. If it doesn’t, attach the name tag to the charging station, display corner, or storage basket instead. This avoids interfering with sensors or movement.
Personality details can go beyond names. You can create tiny badges, themed symbols, color-coded accessories, or little “mood” cards. For example, a robot dog named Pixel might have a pixel-art tag and a matching display mat. A robot cat named Mochi might have soft pastel accessories. These details make the robot pet more memorable and help shape the way people interact with it.
DIY Robot Pet Hack #10: Try Beginner-Friendly Tech Add-Ons Carefully
Some owners eventually want more than fabric and cardboard. If you’re comfortable with beginner electronics, you can create external tech accessories that sit near the robot rather than modifying the robot itself. This is the safest way to experiment because you aren’t opening the device, changing wiring, or risking the warranty.
For example, you could create a separate LED-free display sign, a sound-reactive room decoration, or a simple Arduino-powered prop that moves beside the robot. Science Buddies’ companion robot project shows how sensors and vibration motors can be used in DIY companion builds, but that kind of electronics work should stay separate from a commercial robot pet unless you fully understand the hardware.
If you use Raspberry Pi, Arduino, or microcontrollers, treat them as companion accessories rather than upgrades to the robot pet itself. A small external “play station” with buttons, lights, or sound prompts can be fun, but don’t connect it physically or electronically to the robot unless the manufacturer supports that kind of customization.
What Not to Do When Making Robot Pet Accessories
The biggest mistake is treating a robot pet like a regular toy. A stuffed animal can wear a tight costume or a glued-on decoration without consequences. A robot pet has moving parts, electronics, sensors, and charging systems that need space to function.
- Don’t cover camera lenses, microphones, speakers, touch panels, or vents.
- Don’t place fabric near wheels, joints, or feet.
- Don’t add heavy accessories that change the robot’s balance.
- Don’t use wet paint, glue, nail polish, or cleaning chemicals directly on the robot’s body.
- Don’t attach anything permanent unless the manufacturer specifically says it’s safe.
Also, be careful with accessories that look harmless but create problems over time. Glitter can shed into seams. Stickers can leave residue. A loose thread can wrap around wheels. Thick fabric can trap heat. Small decorations can fall off and get stuck under the robot. A good DIY robot pet accessory should be easy to remove, easy to clean, and easy to inspect.
When to Buy Accessories Instead of Making Them
DIY accessories are great for soft customization, display areas, storage, and simple play props. However, there are times when buying accessories makes more sense. If you need replacement chargers, batteries, dock parts, wheels, protective shells, or model-specific attachments, official or compatible products are usually safer.
Commercial accessories are also better when a precise fit matters. A robot pet carrying case, replacement charging dock, or protective cover needs to match the device closely. A homemade version may work for display, but it may not protect the robot properly during travel.
The best approach is to mix both. Buy anything that affects safety, charging, protection, or mechanical function. DIY the accessories that add personality, organization, photo value, and play. That balance lets you enjoy creative customization without risking an expensive robot pet.
Frequently Asked Questions
Can you put clothes on a robot pet?
Yes, but only if the clothing is lightweight, loose, and doesn’t block sensors, speakers, cameras, microphones, vents, wheels, legs, or charging contacts. Partial accessories are usually safer than full outfits. A bandana, cape, bow tie, or scarf is easier to manage than a fitted costume that wraps around the whole body.
Can DIY accessories damage a robot dog?
They can if they’re too heavy, too tight, sticky, or placed near moving parts. The safest accessories are removable and made from soft materials. Before leaving an accessory on during active use, test the robot for a few minutes and watch whether it moves normally.
What materials are best for robot pet accessories?
Felt, cotton, fleece, soft elastic, Velcro, EVA foam, cardboard, and smooth 3D-printed plastic are good options. Avoid glitter, loose beads, rough metal parts, strong magnets, wet paint, and adhesives that touch the robot directly.
Can kids make robot pet accessories?
Yes, and it can be a great creative STEM activity. Adults should help with measuring, cutting, hot glue, electronics, and anything placed directly on the robot. Kids can safely decorate backdrops, organize accessories, design name tags, and help build cardboard play areas.
Can I use 3D-printed accessories on a robot pet?
Yes, but only if the accessory is smooth, lightweight, and doesn’t clamp tightly around the robot. Poorly fitted 3D-printed parts can scratch the body, block sensors, or interfere with movement. It’s safer to use 3D printing for stands, ramps, organizers, and display pieces rather than wearable parts.
What’s the easiest DIY robot pet hack for beginners?
A soft bandana or name tag is the easiest place to start. It requires minimal materials, doesn’t need electronics, and can be adjusted quickly. A charging station is another beginner-friendly project because it improves daily use without attaching anything to the robot.
Should I modify the inside of my robot pet?
No, not unless the product is designed for hardware customization and you know what you’re doing. Opening a commercial robot pet can void warranties, damage electronics, or create safety risks. External accessories are much safer for most owners.